Naturally this requires a jailbroken ipod/phone:
http://www.touchpadpro.com/2008/03/introducing-touchpad-pro.html
This is seriously cool. Using my touch as a touchpad? Oh hell yes. It works really well from my playing with it. If you have a jailbroken iThing, then you need this app.
Update: I've been using this app now for a good day or so, and I absolutely love it. A lot of the apps on my ipod right now are more... gimmick then useful. They are neat to have but I don't use them very often. I've found this is actually easier to use then my full size mouse when I'm doing just some light web browsing, and with the remote mode I've got it set up to control iTunes/VLC.
For those of you that are curious, it's relatively easy to do. VLC is controllable by the keyboard so all you need is to switch to remote mode and use the 'Space' button to play/pause (Great if like me you have your computer wired to the tv in the other room).
As for iTunes, it is slightly more involved as iTunes doesn't support global hotkeys, but that is easily remedied with a third party app: iTunesControl - What I've done is set the hotkeys for next/previous song to be CTRL+left/right Arrow, so I just hit the ctrl button on the remote, and press the arrow keys. Easy!
Wednesday, March 5, 2008
IE8 Beta Released
So, the IE8 beta is released today (from here). I downloaded it (begrudgingly let it over-write my IE7 install) and rebooted. The interface is like the spawn of IE6 and IE7. Surprisingly (and I don't expect this to survive the beta) they have added a "Emulate IE7" button. My only grief with it is that you need to restart IE completely before it will take effect.

From what I can tell, it -does- pass the Acid2 test (although it remains to be seen if it codes specifically for the acid test, that is beyond my ability to know):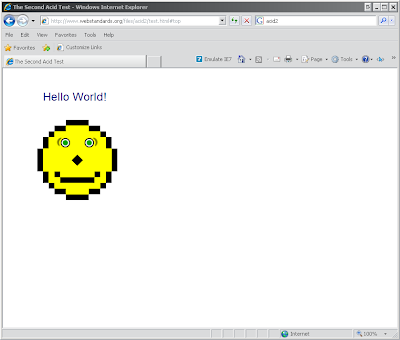
As for Acid 3?
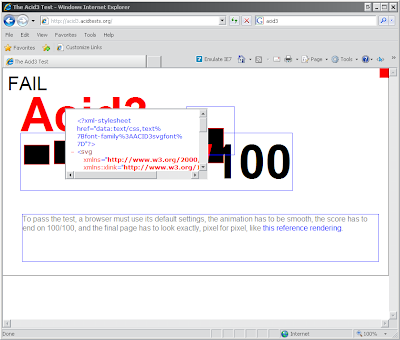
Fail. Now, to be fair, Firefox 3 doesn't render it completely either, but it does get up to 60/100 on my install, and you can actually tell it is a bar gradient, etc.

From what I can tell, it -does- pass the Acid2 test (although it remains to be seen if it codes specifically for the acid test, that is beyond my ability to know):

As for Acid 3?

Fail. Now, to be fair, Firefox 3 doesn't render it completely either, but it does get up to 60/100 on my install, and you can actually tell it is a bar gradient, etc.
HOWTO: Run IE6 and IE7 together
If you have ever had the need to test a website in both crappy versions of IE, and you've got IE7 installed, this will help you. Just head over to evolt - Download the IE6 binary, extract it to a folder and run it. Simple.
HOWTO: Dual Monitors in Linux with ATI
After searching for many hours and finding many different howtos that didn't work for me, I thought I'd post what I found actually worked in my case. Note, with the ATI cards in particular in linux, it seems like even the same cards using the same driver versions work differently, so this may not work for you. But unlike a lot of the howtos I've seen, this isn't destructive. This will also assume you have installed the latest version of the ATI proprietary drivers.
My problem in particular was that I'm using two monitors of different sizes and resolutions. It seems like it is easy enough to have two of the same size/resolution monitors. Anyway, I'm running a 20.1" screen as my main with a 1680x1050 resolution, and my secondary is a 17" with 1280x1024 resolution, I also have them set so the secondary monitor is to the left of the main monitor.
ALWAYS BACKUP YOUR xorg.conf FILE BEFORE EDITTING IT!!!! I CAN NOT STRESS THAT ENOUGH - It is possible these changes will cause X to not start and you will need to restore the backup.
Anyway, If you haven't yet configured the main monitor properly, you need to run
Once aticonfig has set up your xorg.conf file, you need to open it up in your favorite text editor and add these lines to the device section that ATI set up. If your xorg.conf file is as sloppy as mine, you may have several "device" sections, so you are looking for this one:
The important part to look for is the "aticonfig-Device[0]" - this tells you that this is the ATI device.
Next step is to add these lines to your file:
As for what these options mean:
Please drop a comment if you found this helpful (or if it didn't work for you, what you did to fix it, etc).
My problem in particular was that I'm using two monitors of different sizes and resolutions. It seems like it is easy enough to have two of the same size/resolution monitors. Anyway, I'm running a 20.1" screen as my main with a 1680x1050 resolution, and my secondary is a 17" with 1280x1024 resolution, I also have them set so the secondary monitor is to the left of the main monitor.
ALWAYS BACKUP YOUR xorg.conf FILE BEFORE EDITTING IT!!!! I CAN NOT STRESS THAT ENOUGH - It is possible these changes will cause X to not start and you will need to restore the backup.
cd /etc/X11/
cp xorg.conf xorg.conf.backup
Anyway, If you haven't yet configured the main monitor properly, you need to run
aticonfig --initialThat will change your xorg.config file to add the various ATI stuff. There is a way to use the aticonfig command to setup the dual monitors, but I never was able to get Big Desktop to work properly with it. I'd have two monitors, but they'd be separate (IE, I couldn't move windows from one to the other).
Once aticonfig has set up your xorg.conf file, you need to open it up in your favorite text editor and add these lines to the device section that ATI set up. If your xorg.conf file is as sloppy as mine, you may have several "device" sections, so you are looking for this one:
Section "Device"
     Identifier      "aticonfig-Device[0]"
     Driver          "fglrx"
     Option          "VideoOverlay"  "on"
     Option          "OpenGLOverlay" "off"
EndSection
The important part to look for is the "aticonfig-Device[0]" - this tells you that this is the ATI device.
Next step is to add these lines to your file:
Option "DesktopSetup"  "horizontal,reverse"
Option "Mode2"         "1280x1024"
Option "DesktopSetup" "LVDS,AUTO"
Option "EnablePrivateBackZ" "yes"
Option "HSync2" "65"
Option "VRefresh2" "60"
As for what these options mean:
- Option "DesktopSetup" -> This is how your monitors are physically configured, Horizontal means they are next to each other, and reverse means Monitor 2 is to the left of Monitor 1. Other options are vertical, and not having the reverse modifier there.
- Option "Mode2" -> This is the resolution of your second monitor
- Option "DesktopSetup" -> The types of monitors that is connected LVDS = LCD, CRT, AUTO.. leaving this as auto should work.
- Option "EnablePrivateBackZ" -> This enables 3d support for both monitors.. this may not work but it seems to work for me.
- Option "HSync2" -> Set the horizontal sync of your second monitor, 65 seems to be a default value for 99% of LCDs
- Option "VRefresh2" -> Vertical refresh of your second monitor, 60 is mine, you will probably have to look yours up if it doesn't work.
Section "Device"As I said, these options work for me. Due to the crappy state of the ATI drivers you may need to play with it. There are a few drawbacks that I've found in that my total resolution should be 2960x1050 however it seems to be 3100x1050, or something similar. I don't notice this since the extra pixels are "off" the monitor. And with the second monitor, there are 26 pixels that fall off the bottom of the monitor, but in practice I've never really had an issue with it.
Identifier "aticonfig-Device[0]"
Driver "fglrx"
Option "VideoOverlay" "on"
Option "OpenGLOverlay" "off"
Option "DesktopSetup" "horizontal,reverse"
Option "Mode2" "1280x1024"
Option "DesktopSetup" "LVDS,AUTO"
Option "EnablePrivateBackZ" "yes"
Option "HSync2" "65"
Option "VRefresh2" "60"
EndSection
Please drop a comment if you found this helpful (or if it didn't work for you, what you did to fix it, etc).
Tuesday, March 4, 2008
HOWTO: Prevent a BSoD from disappearing
I'm going to go over the simple steps of setting a Windows XP install to not auto-reboot on a Blue Screen of Death. While this may be nice if you get it once in a while, if, like me, you break something that prevents Windows from booting because of a BSoD having it reboot instantly makes it impossible to see what is going on. Many of you may know this, but I hadn't yet figured out how to do it until last night when I managed to prevent Windows from booting.
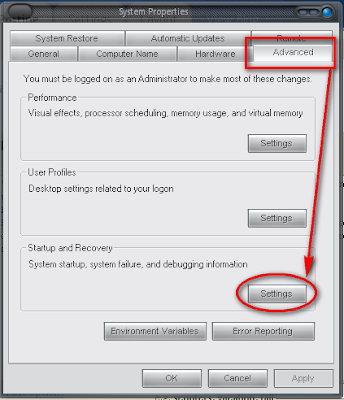
Step 1:
Right click My Computer and go to System Properties (Or, if you like the keyboard, Win+Pause/Break). Click the 'Advanced' tab.
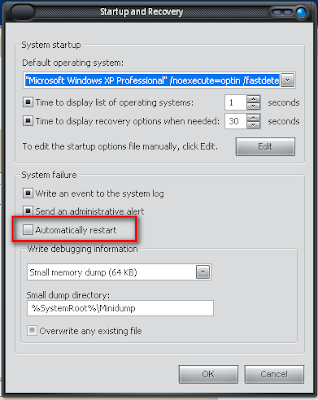
Step 2:
Click 'Settings' under 'Startup and Recovery'. Under the System Failure heading, uncheck 'Automatically Restart'.
Now, when you BSoD, you'll actually be able to -read- the error message and try to solve the problem. In my case it was a corrupt vidstub.sys file.
UPDATE:
If you are unable to even boot in to safemode to get this done, there is help!
First, you need to download a boot disk that has a registry editor. I recommend:
http://www.ultimatebootcd.com/
It's been a while since I've used it, but it has always worked for me.
Open up the registry editor (It's under NTFS tools) and edit this key (Odd formatting because of limit in width of the blog):
HKEY_LOCAL_MACHINE\
SYSTEM\
ControlSet001\
Control\
CrashControl
Change AutoReboot key to 0
Hope that helps!
Step 1:
Right click My Computer and go to System Properties (Or, if you like the keyboard, Win+Pause/Break). Click the 'Advanced' tab.

Step 2:
Click 'Settings' under 'Startup and Recovery'. Under the System Failure heading, uncheck 'Automatically Restart'.

Now, when you BSoD, you'll actually be able to -read- the error message and try to solve the problem. In my case it was a corrupt vidstub.sys file.
UPDATE:
If you are unable to even boot in to safemode to get this done, there is help!
First, you need to download a boot disk that has a registry editor. I recommend:
http://www.ultimatebootcd.com/
It's been a while since I've used it, but it has always worked for me.
Open up the registry editor (It's under NTFS tools) and edit this key (Odd formatting because of limit in width of the blog):
HKEY_LOCAL_MACHINE\
SYSTEM\
ControlSet001\
Control\
CrashControl
Change AutoReboot key to 0
Hope that helps!
Saturday, March 1, 2008
HOWTO: Linux/Rst-B Scanning
As much as we all love to rave about how secure *nix installs are, it -is- still possible to get infected by the one or two variants of malware out there. Some admins (myself included at points) get lulled into a sense of security knowing that we've got billions of Windows machines acting as human shields to protect us, but we do need to take steps to make sure we don't become part of the botnet brigade.
There is one package out there (Linux/Rst-B) that seems to be the most common (relatively speaking) issue out there for *nix, and there is a handy tool for detecting it. It comes with a pre-compiled binary for Debian (which works in Ubuntu as well).
We're going to put it in /usr/local/sbin, so that it is on the path for later on:
This will extract the detection_tool/ directory, which gives you the source and the pre-compiled binaries. To compile from source:
OR, if compiled from source:
To use:
So to scan the entire filesystem:
If all is well, you'll get this output:
Anyway, best of luck.
NOTE: This howto taken from Howtoforge - Which is a great place for howtos relating to linux. I've altered it a bit to make it a bit easier to read IMHO.
There is one package out there (Linux/Rst-B) that seems to be the most common (relatively speaking) issue out there for *nix, and there is a handy tool for detecting it. It comes with a pre-compiled binary for Debian (which works in Ubuntu as well).
We're going to put it in /usr/local/sbin, so that it is on the path for later on:
sudo su -I realize that you can just sudo the wget and extraction commands if you don't have write privs on sbin/, but hey, I'm lazy.
cd /usr/local/sbin/
wget http://www.sophos.com/support/cleaners/detection_tool.tar.gz
tar xvfz detection_tool.tar.gz
This will extract the detection_tool/ directory, which gives you the source and the pre-compiled binaries. To compile from source:
cd /usr/local/sbin/detection_toolCopy the binary to the sbin/ directory with link:
make
ln -s /usr/local/sbin/detection_tool/pre-compiled/detection_tool /usr/local/sbin/rst_detection_tool
OR, if compiled from source:
ln -s /usr/local/sbin/detection_tool/detection_tool /usr/local/sbin/rst_detection_tool
To use:
rst_detection_tool [-v] (path)
So to scan the entire filesystem:
rst_detection_tool /
If all is well, you'll get this output:
root@ubuShock:/usr/local/sbin# rst_detection_tool /
Sophos Rst-B Detection Tool
---------------------------
Copyright (c) 2008 Sophos Plc. All rights reserved.

Scanned 681699 files, found 0 infections of Linux/Rst-B.
End of scan.
root@ubuShock:/usr/local/sbin#
Anyway, best of luck.
NOTE: This howto taken from Howtoforge - Which is a great place for howtos relating to linux. I've altered it a bit to make it a bit easier to read IMHO.
Thursday, February 14, 2008
HOWTO: Mac OSX on a Windows Machine

For this you will need a mac (or a hackintosh) running OSX. This is basically a way to connect multiple users simultaneously to the mac system, a la XDMCP for Linux. The performance isn't quite as good as XDMCP since it uses the VNC protocol, but it is very much usable over a LAN.
All these steps are to be done on the Mac..
Step 1: Create a secondary account. This will be the account you log in to.
Step 2: In the account section in the System Prefrences, open up the Account section, and browse to 'Login Options'. Open this up and enable 'Fast User Switching'

Step 3: Switch to the account you want to be able to connect to via fast user switching. This is accomplished by clicking the user name in the upper right corner and selecting the name you created in step 1.
Note (Thanks John): You need to disable the built-in Leopard screensharing via the Sharing option in System Preferences before installing and using Vine if you have it enabled (It is off by default)
Step 4: Download and install Vine (This is a standalone vnc server. Use this instead of the inbuilt VNC server.) from HERE - You will want to get the 3.0 package.
Step 5: Run the vine server, and set it to open at login by right clicking the icon on the dock, and enabling 'Open at Login'
Step 6: Switch back to your original account
Step 7: Download a vnc client for windows, and connect to the IP address of your mac. If everything went according to plan, you should have your mac desktop sitting on your windows desktop.
A few notes:
You should be able to adjust the screen resolution of the other user without a problem, although there are reports that it can do some odd things to the resolution of the primary user. Basically what happens is this - If you switch on the mac to the secondary user, the display resolution gets overwritten to the default, and you need to change it back with vnc.
Also, if you reboot, you will have to re-login to the secondary account in order to be able to connect.
And hey, if you found this helpful, please leave a comment and click my google ad.
Update: A commenter (John) has recommended that on the windows client, you set the encoder to zlibHex and the compression to 1 for best performance.
Sunday, February 10, 2008
HOWTO: XDMCP with Windows XP
For those of you that aren't in the know, XDMCP (X Desktop Management Control Protocol, if I recall correctly) allows you to log in to a linux machine, as if you were sitting -at- the computer itself. Basically it works like this, I click a shortcut on my desktop, and my secondary (17" monitor) comes alive as the login screen for my linux machine. Yay right?

(Note the KDE on the left, and the XP on the right?)
It's fairly easy to set up. If you are using Gnome (and I'd recommend it for setting this up, as KDE seems to be harder (IE: You need to edit text files, and there are a billion HOWTOS out there for it)), you go to System->Administration-Login Window. Click the remote tab, and choose Style: Plain. THIS IS IMPORTANT. THERE IS A BUG WITH THE CURRENT GNOME VERSION THAT WILL REFUSE CONNECTIONS IF THIS IS NOT PLAIN.
Most of the other options can be left at default. From your windows machine:
Download xming. Yes, you can use cygwin, but it's harder to set up and is only really needed if you want a hell of a lot more linux stuff then you need for this app. Xming is basically a little xserver with a nifty app to let you connect via xdmcp.
Once you get xming set up, open up the xlaunch dialog. Now, for xdmcp you will want to choose One window, or one window without border. If you want the linux window to take up your entire monitor (this is the closest to physically being at the linux machine), you'd choose fullscreen.
Click next, click XDMCP, type your hostname, click next. Under addition options for xming, you can set things like the size of the window, or what monitor it appears on:
-screen 0 @2 -> This will put it on your second monitor, taking up the whole screen
-screen 0 1024 768 -> this will make a window that is 1024x768 (ignored if fullscreen is picked earlier)
After you finish that, you have the option to save it, and the button for finish. Clicking finish will start the connection, hopefully giving you this:
Log in as normal, and viola! Then, you can get really geeky and do something like this!
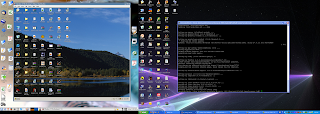 Yes, I'm running XP, which is connected to Ubuntu 7.10, which is running a Virtual Machine of XP.
And hey, if you found this helpful - by all means leave a comment.

(Note the KDE on the left, and the XP on the right?)
Most of the other options can be left at default. From your windows machine:
Download xming. Yes, you can use cygwin, but it's harder to set up and is only really needed if you want a hell of a lot more linux stuff then you need for this app. Xming is basically a little xserver with a nifty app to let you connect via xdmcp.
Once you get xming set up, open up the xlaunch dialog. Now, for xdmcp you will want to choose One window, or one window without border. If you want the linux window to take up your entire monitor (this is the closest to physically being at the linux machine), you'd choose fullscreen.
Click next, click XDMCP, type your hostname, click next. Under addition options for xming, you can set things like the size of the window, or what monitor it appears on:
-screen 0 @2 -> This will put it on your second monitor, taking up the whole screen
-screen 0 1024 768 -> this will make a window that is 1024x768 (ignored if fullscreen is picked earlier)
After you finish that, you have the option to save it, and the button for finish. Clicking finish will start the connection, hopefully giving you this:

Log in as normal, and viola! Then, you can get really geeky and do something like this!
 Yes, I'm running XP, which is connected to Ubuntu 7.10, which is running a Virtual Machine of XP.
And hey, if you found this helpful - by all means leave a comment.
Subscribe to:
Posts
(
Atom
)